ODBC Data Source setup
Setup MonetDB ODBC Data Source on Windows
Start ODBC Data Sources Administrator program (odbcad32.exe).
You can find this program by typing 'odbcad32' in the Start Search field.
Choose ODBC Data Sources (64-bit) if you want to setup a Data Source for
a 64-bit MonetDB ODBC Driver.
Choose ODBC Data Sources (32-bit) if you want to setup a Data Source for
a 32-bit MonetDB ODBC Driver.
After starting this program, select the Drivers tab page.
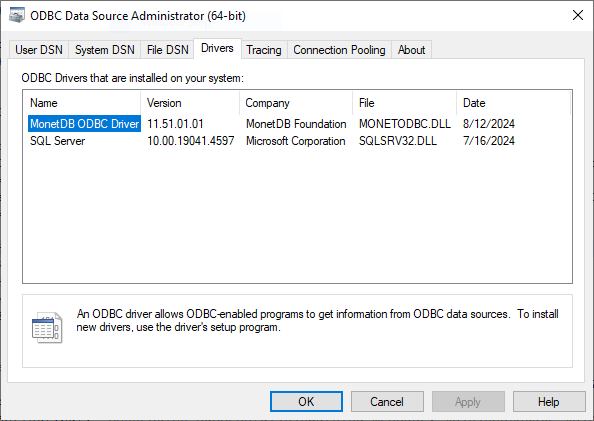
This should list the MonetDB ODBC Driver, version 11.51 or higher.
If it is not listed, install the MonetDB ODBC driver first.
Next select the User DSN tab page (or System DSN if you want the data source to be available for all users of this Windows OS).
On this page click on the Add... button.
A new dialog pops up in which you have to select for which ODBC driver.

Click the MonetDB ODBC Driver option and click on Finish.
Next the MonetDB ODBC Data Source Setup dialog appears.
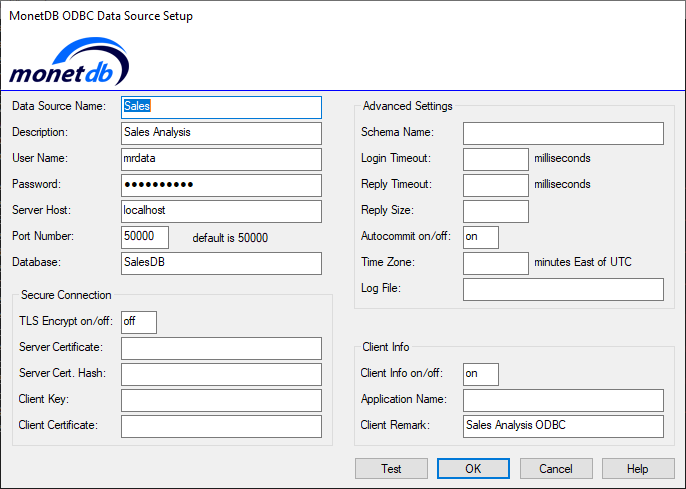
The Data Source Name field is required and acts as an identifier used by ODBC
applications such as MS Excel or MS Query. Use a for users meaningful short name.
Note: the following characters are NOT allowed: [ ] { } ( ) , ; ? * = ! @ \
In the Description field, optionally enter some text to describe the data source.
In the User Name field, optionally enter the database login user name.
Note when using the Test-button this field must be filled.
In the Password field, optionally enter the corresponding password for the login user.
Note when using the Test-button this field must be filled.
In the Server Host field, enter the name or TCP/IP-address of the MonetDB server host to connect to.
When not filled in the default value: localhost will be used.
In the Port Number field, specify the port number the MonetDB server or daemon (monetdbd) is listening on.
Valid range values are between 1 and 65535.
When not filled in the default value: 50000 will be used.
In the Database field, optionally enter the database name.
When connecting to a monetdbd daemon this field becomes mandatory.
Secure Connection parameters
The TLS Encrypt on/off field controls whether TLS encryption must be used (on) or not (off).
Default is off.
When set to on, the next four fields become active.
In the Server Certificate: field, enter the path to TLS certificate to authenticate server with.
In the Server Cert. Hash: field, optionally enter the hash of server TLS certificate.
It must start with these hex digits. This overrides Server Certificate.
In the Client Key: field, optionally enter the path to TLS key (+certs) to authenticate with as client.
In the Client Certificate: field, optionally enter the path to TLS certs for Client Key, if not included there.
Advanced Settings
In the Schema Name field, you can optionally enter the schema name which should be set when connected.
By default it will use the schema name which is set for the user, e.g. for user monetdb this is schema: sys.
See CREATE USER how to specify the default schema for that user.
In the Login Timeout field, you can optionally enter the login time out in milliseconds.
Leave empty to have no timeout.
In the Reply Timeout field, you can optionally enter the query reply time out in milliseconds.
Leave empty to have no timeout.
In the Reply Size field, you can optionally enter a custom query reply size,
the batch number of rows fetched and transferred at once.
When empty it uses the default value of 250 rows per batch.
In the Autocommit on/off field, you can optionally change the default setting (on) of autocommit mode.
For generic ODBC applications (e.g. MS Excel, MS query) this should be set to on,
as that is the default specified by ODBC API.
You could set it to off for your own custom written C ODBC programs where this is needed.
In the Time Zone field, you can optionally enter the a specific time zone.
By default it uses the client OS time zone information, so in normal cases you do not need to specify it.
When filled, it must be entered as an integer value representing the numbers of minutes East of UTC. E.g. when time zone is +02:00, enter 120. When time zone is -09:00, enter -540.
In the Log File field, you can optionally enter the file name (with full path) to log ODBC driver API calls information.
This will slow down the ODBC performance, so use it only for debugging the MonetDB ODBC driver.
The Windows ODBC driver manager also has an option to trace ODBC API calls,
see ODBC Data Source Administrator program Tracing tab panel.
Client Info
The Client Info on/off field controls whether Client Info must be send (on) or not (off) to the server.
Default is on.
Only MonetDB servers starting from Aug2024 (11.51) support storing Client Info temporarily in
the sys.sessions view in
columns: language, peer, hostname, application, client, clientpid, remark.
When the session ends this client information is also gone.
Client Info on/off field to off if you do not want client info to be
send to the server for an ODBC application session.In the Application Name field, you can optionally enter a name to override the default behavior.
By default the ODBC driver will derive the program name of the application which loaded the ODBC driver.
In the Client Remark field, you can optionally enter a remark text.
Test, OK, Cancel, Help buttons
The Test button allows you to test the entered values against a running MonetDB server.
It will try to connect to the server and present the result (success or error) in a pop-up dialog.
On error the dialog also shows the used ODBC connection string and error message information.
For the connection test the user name and password are required, however they are not required when saving this Data Source.
Click OK button to save the entered values for this ODBC Data Source.
The user name and password are stored unencrypted in the registry of Windows OS. For security it may be better to not store password (and possibly user name).
Click Cancel button to discard the changes made.
Click Help button to open this online webpage. This requires a working internet connection.